Go see the cute Easter clip art that we have at Fiverr for just $5.00. This is so adorable and can be used for crafts, scrapbooking or Spring party invitations etc. If you have a family blog it'll be just right to add a touch of Easter.
Showing posts with label Holiday Crafting. Show all posts
Showing posts with label Holiday Crafting. Show all posts
Wednesday, February 22, 2012
Sunday, April 05, 2009
Craft Ideas For Easter - Candy Craft Project
Step 1. Choose an Easter container (it can be a basket, mug, or box) that you want to use in your arrangement. Note: The bigger the container, the more candy you will need to use to make a nice candy arrangement.
Step 2. Take a piece of floral foam and cut it so it fits snugly into the container. You can use hot glue to secure the floral foam to the bottom of the basket. The foam should be about an inch lower than the edge of the container.
Step 3. Prepare the decorative Easter grass; its color should go well with the container. Cover the foam with the Easter grass securing it with floral pins as necessary.
Step 4. a) Take a packaged chocolate bunny. Using hot glue, secure two pieces of bamboo skewer to the back of the package. b) Insert the packaged chocolate bunny in the middle of the arrangement.
Step 5. a) Prepare Peeps you want to use in your candy arrangement, carefully separate the Peeps using a knife. Insert the sharp end of a skewer into each of the Peeps. b) Tie a piece of curling ribbon of the corresponding color around each stick. c) Insert the Peeps into the container to achieve the look you like.
Note: You should not sell this type of bouquet; if you want to make candy bouquets for sale, the candy wrappers must stay intact.
If you would like to see this Easter candy craft project with photos, go to this page
Happy Easter to you and your family!
Lana Glass - Founder of the Site Incredible Edible Crafts More Candy Craft Projects
Monday, December 29, 2008
Aluminum Can Crafts - Interesting Craft Ideas
Kids love crafts, and aluminum cans are a perfect craft base because they are in abundance. The aluminum makes them sturdy and sometimes waterproof (depending on what is put over them).
Free Aluminum Can Crafts - Ghostie
For this project you will need to gather an aluminum pop can, clear acrylic spray, white and black paint, fishing line, paint brush, masking tape and scissors. Before you begin, remove the tab from the top of the can. The can will need to be crushed in a certain way, so it might be a good idea to have some extra cans around in case the originals don't get crushed the way you'd like them to. For the silhouette of the ghostie, crush the top part of the can in one direction, opposite the bottom portion. If sharp edges remain, these should be smoothed over with masking tape. Depending on the type of paint you're using and the colors in the crushed can, it may take several coats to cover the can so it appears simply white.
The black paint is now used to create the mouth and eyes. The opening of the can, where the tab was pulled, should be used as the mouth, and eyes can be hand painted above that opening. Wiggle eyes can be used, but it's best to glue these on once the whole project has been sealed. Allow the paint to dry, and then use one more dot of white inside the black eyes. You can then create a 3-d effect with the eyes to allow the white dots to dry then add two more black dots. This makes it look like an pupil and gives it a little more interesting detail. Seal the ghost with acrylic spray using as many coats as you wish. Attach the fishing line to the back of the ghostie then hang it from a window or doorway!
Free Aluminum Can Crafts - Christmas Tree
You'll need 27 emptied and rinsed aluminum cans, Christmas tree lights (one or two strands), spray paint, a hot glue gun, a foam core board or piece of plywood, and duct tape. Arrange the cans by creating a trunk of three cans in two rows, glued together with hot glue. On top of this, six cans are glued together and lay on top of the "trunk." On top of the six row (or first layer), create a five can "branch," then four, then so on, until you have one on the top, so it resembles a Christmas tree. Spray paint the tree whatever color you'd like, secure the lights with duct tape, pushing the lights between the cans. Glue your tree on to the piece of plywood if it is to be hung outside, or use the foam core for indoor use. Try using stickers as ornaments, and even a tree topper!
Free Aluminum Can Crafts - Cow
Items for this project include white, black and pink paint, white felt, wiggly eyes, an aluminum can (crushed) and acrylic spray paint. Crush the can so the head of the cow (top of the can) is crushed above the bottom portion. If there are jagged edges in the tab (which needs to be pulled out), soften with masking tape. Paint completely with white paint, allow to dry. Pain black cow spots on the can (they resemble clouds), and a pink nose on the tab portion of the can. Attach white (or black) felt triangles to the back of the cow's head. Seal with acrylic spray and when this process is complete, glue on wiggly eyes. Instant cow! Following these simple directions and with minor adjustments, you can make an entire barnyard!
Wendy Pan is an accomplished niche website developer and author.
To learn more about free aluminum can crafts, please visit Free Crafts Center for current articles and discussions.
Article Source: http://EzineArticles.com/?expert=Wendy_Pan
http://EzineArticles.com/?Aluminum-Can-Crafts---Interesting-Craft-Ideas&id=1584040
Thursday, December 18, 2008
Deck Your Halls With Easy Christmas Crafts
Nowadays, you don't have to spend a lot to decorate your house, even during the holidays. This coming December, try making these easy Christmas crafts to liven up your homes during the holiday season.
CHRISTMAS WREATHS
A wreath is an easy Christmas craft that you can make. When making a classic Christmas wreath, get three or more separate pieces of wire and twist them around each other. This serves as the base of the wreath. You can also buy a ready-made base composed of wire or wood from the local store.
Once you have the base ready, you can start adorning it using different materials. You can use pine boughs and glue them to the wreath base. If you're looking for a more traditional look, try using Holly leaves. Use small artificial fruits and place them loosely around the wreath. You can also add ribbons and glitters to make the wreath more festive.
CHRISTMAS STOCKINGS
Making personalized Christmas stockings makes the holidays even more fun for children. Draw two outlines of a sock on a red piece of fabric, and cut around it. Sew the two pieces together to make a basic Christmas stocking.
You can now start adding your personal touches to this easy Christmas craft. You can use fabric paint, glitter-and-glue pens, or iron-on letters to write your name on the stocking and draw other designs. Sew or glue buttons, beads and ribbons around your name. Finally, don't forget to sew a ring at the top of the stocking, so you can easily hang it on a hook.
CHRISTMAS ANGEL AND SANTA
The best way to complete your Christmas tree is to add an angel at the top. Use a pinecone for the angel's body and get two dry leaves of approximately the same size for the wings. Coat the wings with spray sealer and glue them to the back of the pine cone. Next, get a circular piece of wood and draw in a face. Shape a thin gold wire like a halo and attach it to the angel's head. Finally, attach the head to the pine cone body.
Another easy Christmas craft to make is a Santa. Use a small sock and fill it with cotton balls. Tie or glue the back. Next, cut out eyes, a mouth and a nose using felt paper and glue it onto the sock. Use red foam for the hat and several pieces of white yarn for Santa's beard. Finally, you can attach a pin or a magnet at the back.
These are only some easy Christmas crafts you can make. There are many other things you can choose from or create, such as Christmas balls, door hangers and even miniature Christmas trees. Try it!
Katya Coen provides information on Christmas craft patterns for All Christmas Crafts.
Article Source: http://EzineArticles.com/?expert=Katya_Coen
Win $500 in Arts & Crafts Supplies!
You can never have enough arts and crafts supplies, and what could be better than winning $500 worth of goodies? Plaid Online is holding a sweepstakes where you can get the chance to win one of 3 $500 craft-supply prizes. Contest ends 1/31/09. See site for rules.
Thursday, December 11, 2008
Jazz up the Holidays with Luxurious Handmade Touches
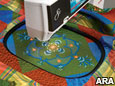

(ARA) – Between baking cookies, shopping for gifts and attending all those special events, the holidays can be extremely busy. Even though days can be demanding, you still want to decorate your home and create a beautiful environment for your friends and family to celebrate this special time of year. Luxurious handmade touches make a home festive and gifts unique, and with the right tools, it's easier than you think.
As you shop through stores, look for ideas from the abundance of holiday-themed items displayed. Another good place to be inspired and find something distinctive is at your local craft store. You might note a lot of items are embroidered, which is very trendy right now. Embroidery is the perfect handmade touch for holiday decor and gifts. It is not only elegant, but personalizes something that might otherwise seem a bit generic.
One tool that can help you give a touch of class to your holiday items is the BERNINA 830. This state-of-the-art sewing and embroidery system machine has a touch screen and offers twice the space of the standard sewing machine with a slew of tools to make sewing and embroidery quick and easy. You can use the jumbo hoop (16 by 10 inches) to embroider just about anything fast for that perfect holiday look.
Here are some ideas to add a luxurious, personal touch to your holidays:
* Enhance what you have.
Don't buy a new tablecloth, placemats or napkins this year. Why not take what you have and enhance it? For example, you might have a dark green tablecloth that is still in great shape. Try embellishing it for a custom look. Sew on or embroider a holiday image such as a candy cane in traditional colors or holly leaves in metallic thread for a festive table setting.
* Get a lush, holiday look in no time.
Rich, luxurious fabrics really stand out during the holiday season. Choices like silk, satin and velvet are great for sewing projects and produce a finished product that is lavish yet comfortable. Think sewing on these types of fabric is hard? Tell the BERNINA 830 what type of fabric you are using and its thickness and the machine will tell you what needle, thread, presser foot and stitches to use to get the best results.
* Deck the halls with family.
Christmas stockings are a great project in which to incorporate your children's personalities. You can customize by sewing each child's name in a fancy alphabet style, but don't stop there. If little Susie likes to dance, add a pair of ballet slippers or if big brother Jim likes baseball, add a bat and glove. They'll feel special and all your guests will compliment such exceptional stockings. Go one step further and coordinate the tree skirt with ideas and themes unique to your family.
* Customized gifts stand out.
What do you get your best friend who has everything or your mom who you always just buy a cozy sweater? Mix it up and use embroidery to customize a gift that will truly stand out from the rest. Pillowcases and towels are perfect for embroidered embellishments. Clothing like sweaters, scarves and gloves work as well. Go traditional and print a monogram or try something different and add your own design. With the BERNINA 830 you can feed your unique designs into the built-in computer system and let the machine embroider the item of your choice with your special design -- while you work on another task.
* Give the gift of time.
With your new sewing machine, you now have access to a tool with unlimited possibilities. Why not give your seamstress abilities as a gift? Everyone has pants to be fitted or wants nice place settings for their next formal dinner. Tell that special someone you have the tools and know-how to get the job done fast. They'll be thrilled at your gift and appreciative of the time and money you will save them.
A luxurious handmade holiday is easier than you think. Visit www.Bernina8series.com to learn more and find a dealer near you.
Courtesy of ARAcontent
Decorative Projects for the Holidays
(ARA) – The weather is changing and the days are getting shorter, which means the holiday season is just around the corner. As you prepare to host family and friends, now is the time to dust off those old decorations and to consider some simple ideas to add a festive feel to your home this year.
“The holiday season is a special time for families,” says Ashleigh Sala, Dremel associate product manager. “Whether baking cookies, wrapping gifts or decorating our homes, the holidays seem to bring out the creative spirit in all of us.”
If you have a busy schedule or a small budget, you can still find inspiration to decorate for the holidays. By following a few simple instructions, these inexpensive, decorative projects can add a special touch to your home:
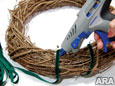
Wreath
Decorating a wreath is an easy at-home project that will highlight your front door for the holidays. To create a unique wreath, you will need to gather your materials, including a fresh pine bough wreath, garland, ribbon, pinecones and berries. The first step is to wrap ribbon around the wreath gluing every four inches to secure. Try the Dremel Glue Gun to prevent drips and to keep your work area clean. Next, wrap garland around the wreath gluing every four inches to secure. Then, glue a variety of pinecones and berries in place around the frame to give it a festive look. The final step is to attach a wire loop on the back of the wreath using picture wire. Once this is done, adorn your front door with your new masterpiece.
Mantle
During the holidays, your fireplace mantle is the perfect place to add festive decorations. It is the one area in your home that will get a lot of attention. Most people decorate their mantle with garland, but consider adding lights and bows to brighten it up. In addition to decorative garland, include eye catching ornaments or even candles. Remember, your mantle is the centerpiece of your room, so choose colors that complement your decor for a fresh look.
Centerpiece
Making a holiday centerpiece is a fun activity that can help spruce up your table with little effort. Start with a wicker basket and glue pine branches or garland in the bottom of the basket, lining the basket. Then, arrange an assortment of artificial fruit or holiday ornaments over the pine branches or garland. Once you have the look that you want, lift each piece of fruit or holiday ball carefully and glue back in to position. After the fruit or ornaments are in place, add accents such as candy canes, berries or even small pinecones to liven it up. Finish the centerpiece by tying a ribbon into a bow and gluing it to the front of the basket. Your table will be ready for a joyful holiday meal.
Coffee Table
To highlight your coffee table, gather a decorative tray, tiny holiday ornaments, holiday ribbon and various sized pillar candles. Arrange the candles on the tray in an asymmetrical pattern. Fill the spaces with the ornaments, weave the ribbon among the tray and light the candles for a soft and portable ambiance.
Candy Dish
Candy plays a central role in most holiday celebrations, so embrace it by making a large, decorative, candy dish to put on display in your home. First, glue candy canes, side-by-side to the outside of a terra cotta pot. For extra sparkle, add other decorations such as beads or ornaments. Then, wrap a ribbon around the pot and tie in a bow. After the candy canes are in position and the ribbon is secure, fill the pot with an assortment of wrapped candy for guests to enjoy. Remember, you may have to refill the dish on several occasions.
For more creative at-home projects, visit www.dremel.com or call the Dremel Experts at (800) 437-3635.
Courtesy of ARAcontent
Handmade Gifts Make a Holiday Comeback

(ARA) – Instead of battling crowded shopping malls and rising prices, Kim Jacobson is spending time in her garage, building holiday gifts in her home woodshop.
For several years, the Minnesota-based occupational therapist has been handcrafting holiday presents as part of her husband Gary's family's unusual -- and refreshing -- annual gift exchange.
"There's only one rule," Gary explains. "Everything has to be homemade. You draw a name at Christmas and have the next year to make that person a present."
It's a tradition Kim says cuts through the commercialism surrounding the holidays, to the core of what the season is all about.
"A lot of love goes into what you make," she says.
It's also part of an emerging trend, according to Ann Rockler Jackson, chief executive officer of Rockler Woodworking and Hardware, one of the nation's largest suppliers of woodworking tools and equipment.
Jackson has seen her company's gift-related supply sales increase steadily over the past five years and believes more consumers are seeking a back-to-the-basics approach to gifts.
"People are getting tired of the shopping-mall mentality surrounding holiday gifts," she says. "Building your own can be so much more personal. There are a lot of creative people out there making incredible, meaningful gifts they couldn't buy at a store. And that do-it-yourself population is growing.
"Plus, it's a nice way to save money," she says. "When you have the skills and ability to eliminate labor costs by doing something yourself, it pays dividends -- particularly in a tough economy."
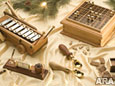
As the number of people building gifts increases, so does the flow of ideas. Rockler has organized an extensive handmade gift list on its Web site, www.rockler.com/handmade.
Some of the more popular projects on the list are relatively simple to build -- things like small jewelry or keepsake boxes. Dominoes, cribbage boards and wooden Sudoku sets are among the many options for beginners. And for those with wood lathes, hardware kits for hand-turned pens, Christmas ornaments and even ice-cream scoops bring the quality of homemade gifts up to -- or beyond -- the store-bought level.
For the Jacobsons, high-quality homemade gifts are nothing new. With several accomplished woodworkers in the family, they have seen some amazing creations over the years.
"Probably the most impressive was a dining room table my cousin made for his sister-in-law," Gary says. "That will be an heirloom, for sure."
Still, the beauty of the Jacobson's tradition -- and one of the driving forces behind home gift-building's burgeoning popularity -- has as much to do with fellowship as it does with craftsmanship.
"It's definitely brought us all closer together," Kim says.
Courtesy of ARAcontent
Friday, December 05, 2008
Homemade Wrapping Paper
Make your own wrapping paper by buying inexpensive paper used to prepare packages for mailing. It comes in rolls and can be found wherever mailing supplies are sold.
Decorate the paper with rubber stamps, sponges dipped in craft paints, or raw potatoes cut in half lengthwise and carved into Christmas shapes by imprinting Christmas cookie cutters into them and then slicing away the extra potato around the imprint, similar to the appearance of a rubber stamp.
Dip the imprint into craft paint and have fun designing your wrapping paper! Try a combination of brown wrapping paper and twine in the place of ribbon to give your packages a rustic appeal.
Rachel Paxton is a freelance writer, mom, and owner of four home and family web sites. For scrapbooking, card making, gift-giving ideas, and more family memory-making activities, visit http://www.crafty-moms.com.
Keepsake Christmas Ornament Box
I love handmade Christmas ornaments. Throughout the years I have collected a number of them, made by myself and several family members. These ornaments will make great keepsakes for our children and grandchildren.
I have been looking for a creative way to store these keepsake ornaments. In the past I have stored them with all my other tree ornaments, but I wanted a special place to store them, especially my daughter's ornaments that we have been collecting for her throughout the years. After purchasing about $20 in supplies and spending a couple of hours working on the project, I ended up with a beautiful keepsake ornament box that I hope my daughter will cherish for years to come.
To complete this project, you will need:
- Unfinished wooden box with lid
- Modge Podge (for decoupaging)
- Christmas cards
- Scissors
- Paint brushes
- Craft paint (optional)
- Acrylic sealer/finisher spray
All of the above items can be purchased at a craft store. The craft store I went to had a variety of boxes to choose from. I chose a small box that was $12.99. It was just what I was looking for!
The box I chose has a raised border around the edges that looked like it would be difficult to work around with decoupaging, so I chose to paint it instead. I painted all the borders with several coats of red acrylic paint.
Next I went through a big pile of old Christmas cards to find suitable images to decoupage onto the box. This was the fun part! Not only can you cut out pictures, you can also cut out holiday sentiments from friends and family members. Just in the past couple of years, several members of our extended family have passed away, and projects such as this keepsake ornament box are a great way to remember lost loved ones. Cut the cards into a variety of sizes and shapes.
Using a paintbrush, apply Modge Podge or a similar decoupage medium to the back of your cut out, then place the cut out on the box. Paint a coating of Modge Podge over the cut out. Continue pasting cut outs to the side of the box until it is covered, then go over the entire side again with another coating of Modge Podge. After the box is completely dry, you can apply another coating for good measure.
After the box is complete (and dry), you can spray an acrylic sealer/finisher spray over the entire box to protect the artwork and eliminate the tackiness of the decoupage.
That's it! There is no limit to the possibilities of decorating this beautiful ornament box. I haven't tried it yet, but I plan to line the inside of the box with felt to give it a more finished look.
Rachel Paxton is a freelance writer and mom of four. For scrapbooking, card making, gift-giving ideas, and more family memory-making activities, visit http://www.crafty-moms.com. This page printed from: http://www.crafty-moms.com/christmas-ornament-box.shtml
Monday, November 26, 2007
Kids Christmas Crafts - Wrapping It Up
Christmas is just around the corner and time to think of gifts for family and friends. I've always found that making gifts is so much more satisfying and enjoyable than spending lots of money so why not encourage the kids to make their own gifts? The making of kids Christmas crafts means them using their imagination and having fun, something that most kids enjoy.
There's no need to stop at making the gift -- why not make the wrapping paper too? Here you will find a few ideas on wrapping those special gifts.
Bubble Wrap Paper:
You will need bubble wrap packaging, butcher paper, tape, thick paintbrush, paint with a few drops of liquid dish wash.
Tape the bubble wrap on a flat surface. Paint the wrap in various colors. While still wet lay the butcher wrap over the bubble wrap to transfer the colors. Lift carefully and allow it to dry.
Salty Wrap:
For this you will need butcher paper, cookie cutters in Christmas shapes, glue (in a saucer or plate) and salt.
Spread the butcher paper out flat. Dip the cookie cutter into the glue and place on the paper to create a glue print. Using a spoon sprinkle the salt on the glue areas, gently move the paper to scatter the salt. Allow to dry and pour off excess salt. You can also pretty up a plain roll of foil paper this way.
Print Wrap:
Materials required: butcher paper, Christmas print stamps, cookie cutters and paint.
Stamp the paper with Christmas theme stamps and use the cookie cutters dipped in paint to make other designs.
Hand crafted gifts made with someone special in mind are always precious. What better way to display the kids Christmas crafts than wrapping them up in hand designed paper.
Lyn Bell has been in the finance industry for more than 30 years and is a Certified Financial Planner. Arts and crafts is one of her hobbies which she enjoys sharing with others. Kids Christmas craft ideas to fill the wrapping can be found at http://hubpages.com/hub/KidsChristmasCrafts . For more craft ideas for kids visit http://craftideasforkids.weebly.com/ and http://artsandcraftsforkids.weebly.com/
Sunday, November 11, 2007
How to Make Holiday Postage Stamps
How to Create Personalized Holiday Postage Stamps
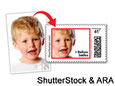
(ARA) – The next great American to be featured on a postage stamp could be you -- or a family member, friend or virtually anyone else you know.
That’s because people can now create their own customized, usable U.S. postage. The postage, called YourStamps, can be a great way to send out mailings for the holidays, a wedding, birthday or anniversary. Whether you include a photo of yourself, a child or even a particularly photogenic pet, the postage can help personalize most any message.
YourStamps are real U.S. postage that feature your own digital photos or artwork and your words. You can create the customized postage at Fujifilm’s http://www.YourStamps.com web site, and pick up your finished postage at a local store or have them mailed to you.
Here are some creative ways to use YourStamps:
* Great Gifts -- What grandparent wouldn’t love a set of stamps featuring their favorite grandkids? And you certainly don’t need to mail YourStamps -- they can also be framed to create a personal piece of art.
* Get Down to Business -- Businesses can use YourStamps to announce new products, promote special offers or services, or showcase their logo. Fundraisers can use the customized postage to raise awareness of their message. Any graphic or promotional message (within the bounds of good taste and USPS content restrictions) can be placed front and center on YourStamps. Plus, the postage is larger than standard-sized postage stamps so your message is more likely to draw attention.
Stamp 101
Stamps have been used to celebrate special events and people since a British school teacher, Rowland Hill, first invented lick-and-stick stamps back in 1837. Hill was knighted for his efforts and Great Britain released the first postage stamp in 1840. The United States began producing its own stamps in 1847, featuring portraits of Benjamin Franklin and George Washington.
Stamps quickly became valued as tiny works of art, and citizens clamored to have particular subjects honored on postage. The U.S. filters these suggestions through The Citizen’s Stamp Advisory Committee. The dozen members of the committee review about 50,000 postage proposals a year; only 35 or so of these ideas actually become stamps.
Happily, you no longer need committee approval to celebrate what matters to you on your postage. Just visit http://www.YourStamps.com, upload your favorite image, add a border and the perfect caption or message, and then place your order.
It’s the perfect way to celebrate your life, your way.
Courtesy of ARAcontent
Friday, March 30, 2007
Tips For Making Your Own Easter Baskets
There use to be a time when buying Easter baskets was affordable. Now, it seems, everything but the kitchen sink is included, making them a bit high in price. Here are some tips for making your own Easter baskets using creative and ingenuous ideas.
A basket can come in any size and shape. Traditionally, an Easter basket is made of wicker, filled with brightly colored cellophane and, of course, the handle. You can make a basket out of things in your home. For example, a milk carton can be used. You can wrap it with brightly colored cellophane or tissue paper; attach a bow for the handle, and Voila! An Easter basket is born.
You can also make a cute little basket using a paper plate and ribbon. Make holes on each side of the paper plate; use a bright colored ribbon to insert through the holes; make a bow and you have a basket, similar to one you would use to carry flowers! There are so many designed plates available in your local supermarket. You can dress it up however you choose. Your little girl will love it!
How about buying a plain basket; take some pink or blue ribbon and weave it through the basket? You can cover the handle of the basket with ribbon as well. Instead of buying the cellophane grass; line the bottom of the basket with colorful tissue paper cut into strips – make a nest, so to speak. Fill the basket with whatever you choose.
It is doubtful you will run out of ideas, but just in case check online and you will find a variety of ways in which you can use a paper bag; and even templates which you can print out to make a unique and creative Easter basket this year. These tips for making your own Easter basket are just the “tip” of the iceberg. If you are a craft person, no doubt you will come up with even more creative ways to make this Easter a fun and exciting one for your kids to remember.
Friday, December 29, 2006
Creating Your Christmas or Hanukah Scrapbook
We hear the phrase “holiday season” beginning as early as October 1st, yet, when it comes to creating scrapbook albums, I often see photos from just the one day of Christmas, or the 8 days of Hanukah.
This year, create your album for the entire season. What does this mean? When do you start your shopping and planning? My kids have always created a wish list for my mom and dad. Make a copy of these wish lists and add them to your scrapbook.
Once you begin your shopping, take photos of the bags and bags of goodies you have purchased. There have been years where I’ve looked in my trunk and just laughed at the amount of bags I have inside. Some years I have bought gifts for teachers, for coworkers, for my family and for the many gift exchanges I’m involved in.
I’ve always done my gift wrapping either during the day when the kids are at school or at night when they are asleep. Take a few photos of the gifts all being wrapped.
Most years, my kids and I bake. We bake for classmates, for coworkers, for those who provide us wonderful service during the years and for the many parties we seem to attend during the “holiday season”. Take photos of your baking process. Consider including a few recipes from your baking in the scrapbook. Copy the recipes onto acid free paper.
Are you having any type of dinner at your home? Again, snap some photos of the grocery list, the preparations and again consider adding a few of your dinner recipes.
Do you put decorations in your home? I have seen absolutely beautiful homes, both for Christmas and for Hanukah over the years. Take photos of your home without guests in it. Then take photos again when the house is filled with people, noise and great food.
Opening presents is a highlight for children. In addition to taking photos of everyone opening their gifts, save some of the wrapping papers for your scrapbook. Save just a little bit as it will yellow.
If you receive cards from family and friends, consider laminating the cards and adding them to your scrapbook. If the card itself it not acid free, it will over time yellow and crack, which is why I suggest laminating them.
This year when you consider your holiday scrapbook, consider the entire season, not just the one or eight days.
Article by:
Audrey Okaneko has been scrapbooking for several years. She can be reached at audreyoka@cox.net or visited at www.scrapping-made-simple.com
Finding The Time To Scrapbook
Click Here for the Ultimate Fast Start Scrapbooking Guide. A Step By Step Guide To Creating Beautiful Layouts!
I had someone tell me yesterday that she had given up scrapbooking as she just couldn’t find the time anymore. I asked if she could find 30 minutes once or twice a week. She said with some planning, she could find 30 minutes a few times per week.
Often we think of scrapbooking as a start to finish project requiring several hours of our time. However if we begin to think of scrapbooking in 30 minute increments, we can complete albums and still have time to be mom, work, cook etc.
Start by choosing a theme and choosing photos. Your first half hour will be nothing more than choosing photos.
Your next half hour slot will be choosing papers. Choose both background papers and cardstock to mount your photo. You may not be able to choose paper for the entire album in this one sitting, but you can begin to choose the papers you’ll be using for your scrapbook.
Cropping the photos is your next step. Again, you may not finish all photos in one sitting but you can certainly start the cropping process in one 30 minute segment.
Next comes the mounting of the photos. This can be done in the car while waiting for carpool. This can be done while your older child is taking a bath and you are just waiting. This can be done while waiting in a doctors office.
Journaling and embellishments are the last step in putting together your scrapbook. Journaling again can be done most any time and any place. Choose how you will journal. Then write on the paper of your choice.
Choose your embellishments. These can be added in one 30 minute segment. By creating your scrapbook in steps and in 30 minute fragments, you’ll find you do have the time to complete a scrapbook and have a lasting memory.
Article by:
Audrey Okaneko has been scrapbooking for several years. She can be reached at audreyoka@cox.net or visited at www.scrapping-made-simple.com
Saturday, December 09, 2006
Christmas Craft Idea: Lighted Holiday Potpourri Jars

Lighted Holiday Potpourri Jars
by Rachel Paxton - rachel@creativehomemaking.com
Description: Lighted holiday potpourri jars are easy to make holiday gifts.
Lighted potpourri jars are a festive addition to any holiday decor. They are inexpensive, easy to make, and make great hostess gifts.
Lighted potpourri jars are a festive addition to any holiday decor. They are inexpensive, easy to make, and make great hostess gifts.
SUPPLIES:
1 package Christmas lights (20-bulb strand)
Wide-mouth canning jar
Potpourri
Holiday ribbon
Pinecones, small holiday decorations
Doily or holiday fabric cut to fit over the mouth of the canning jar
Glue gun
DIRECTIONS:
Plug in light strand and see if any bulbs are burned out and need to be replaced. Arrange light strand and potpourri in canning jar while lights are on so you'll be able to get it just right and be able to see what it will look like when it's finished.
Place doily or fabric on top of jar, arranging the cord of the light strand so it's coming out where you want the back to be. Tie some ribbon around the neck of the jar to hold the fabric in place. When you get it arranged the way you like it, use the hot glue gun to glue the fabric and ribbon down in several places so it will hold.
Decorate the outside of the jar with festive decorations like pine cones or artificial holly berries. Craft stores have a variety of holiday decorations you can cut apart and re-arrange any way you like.
Experiment with different potpourri scents. The lights in the jar will warm up the potpourri and help the scent fill the room. These jars are very pretty and will look different depending on if you use clear or colored lights. These are great for last-minute present ideas or hostess gifts. Happy holidays!
Note: Only plug in for 1-2 hours at a time. Leaving it plugged in for long periods of time could cause a fire hazard.
Rachel Paxton is a freelance writer and mom of four. For scrapbooking, card making, gift-giving ideas, and more family memory-making activities, visit http://www.crafty-moms.com.
---------------------------------------------------------------------------
Visit Grandma Rosie Today! Come On Over for a Visit...
---------------------------------------------------------------------------
Visit Grandma Rosie Today! Come On Over for a Visit...
Thursday, October 19, 2006
Fall Craft Idea with Pumpkins: Easy Pumpkin Centerpiece
 Need an easy, inexpensive centerpiece for your autumn table? All you need is a pumpkin and a handful of fall flowers. You can complete this project in less than an hour!
Supplies:
Pumpkin
Fall flowers
Sharp knife
Large spoon
Prepare your work area by spreading out some old newspapers. Using a sharp knife, carefully remove the top of the pumpkin. Use the large spoon to scoop all of the pulp and seeds out of the pumpkin.
If you need this done in a hurry for a dinner party, go ahead and arrange your flowers inside the pumpkin. If you have the extra time, let the pumpkin dry out for at least a couple of hours before you arrange your flowers.
I used artificial flowers in my pumpkin centerpiece, but you could also use fresh flowers. If your pumpkin is wide and deep enough, you could place an entire flower pot in it.
Use your pumpkin to decorate your fall or Thanksgiving table, or place it anywhere in your home to give your home the feel of autumn.
Rachel Paxton is a freelance writer and mom who is the author of What's for Dinner?, an e-cookbook containing more than 250 quick easy dinner ideas. For more recipes, organizing tips, home decorating, crafts, holiday hints, and more, visit Creative Homemaking at http://www.creativehomemaking.com/
Primitive Craft Project:How to Make a Tin Can Luminary
Tin can luminaries are a fun, easy craft project for all ages. They are great for any holiday and only limited by your imagination! You can transfer any simple shape onto a tin can to create a beautiful candle holder for any occasion.
I chose to make luminaries for Christmas this year. You can choose any simple design to transfer onto your tin can. I used a favorite clip art program on my computer to look for easy Christmas designs to print out. I chose a Christmas tree, a snowman, and a pair of gingerbread men.
Here's what you need to get started:
- Empty tin cans (washed and labels removed)
- Design to transfer onto can
- Hammer
- Large nail
- Tape
- Dish towel
It is easiest to punch the holes in your tin can if you freeze some water in it first. Fill the can with water, leaving 1/4 inch space at the top for the ice to expand. Place in freezer until frozen. Your can may bulge a little at the bottom while in the freezer, but after you remove the ice you can use the hammer to flatten out the bottom of the can.
You might want to freeze a couple more cans then you think you'll need in case you make a mistake and have to start over again.
After the ice has frozen, take the tin can from the freezer and tape your design to the can. I used packing tape, but you can also use duct tape. The tape won't stick to the cold can, but you can wrap the tape all the way around the can so it will stick to the paper.
If you don't have a design on paper, you can also draw a design on the can freehand with a permanent marker. You can also just punch the design freehand without drawing it first.
Lay the can on a folded dish towel so the towel will catch the ice chips that try to escape. It will also hold the can in place. Using the hammer and nail, tap holes around the border of your design, trying to punch holes evenly and not too close together. You want a simple design so that when you see only the holes in the can you will be able to tell what it is!
After punching the holes, remove the paper and tape and admire your design. It is really so easy! If you plan to hang your luminary, also punch two holes at the top of the can. You can make a handle out of wire (from a craft store) or a wire coat hanger.
Place the tin can under running warm water to melt the ice. Dry the can with a towel and place a votive candle in the bottom. You will need a long lighter or match to light the candle.
To further decorate your tin can luminary, you can spray paint the can any color you wish. Be creative!
This is a great family project. Just make sure kids have adult supervision while using the hammer and nails. Have fun!
Photos of project: http://www.crafty-moms.com/tin-can-luminary.shtml
Rachel Paxton is a freelance writer and mom who is the author of What's for Dinner?, an e-cookbook containing more than 250 quick easy dinner ideas. For more recipes, organizing tips, home decorating, crafts, holiday hints, and more, visit Creative Homemaking at http://www.creativehomemaking.com
Monday, September 04, 2006
Halloween: History And Origin
Primitive Extra Grungy Witch Hat - Halloween Decorating - View Now!
Halloween is that time of the year that's absolutely freakish and screamingly fun. A time when the line between the world of the living and the world of the dead is the thinnest and you’re sure to feel the freak and scare with ghosts, goblins, witches and werewolves prowling all around—both in their selves and in costumes. Halloween is an occasion to let loose the naughtier sides in you—playing pranks, sprucing up in freaky costumes and scaring the wits out of your folks. The chill of rib-tickling thrill, a nip of spine-chilling jitters and a good fare of full-blooded scare is at the heart of Halloween celebrations.
Now today's Halloween isn't the same as it was 2000 years ago. The history and origin of Halloween lie way back in centuries in the ancient Celtic New Year's festival, Samhain. So much so that the customs of today’s Halloween are also rooted in the ancient customs of the Celts during Samhain, which was said to mark the end of Summer. Samhain, the Celtic New Year was celebrated every year on October 31—the day, which the Celts believed, was a day of the rise of the dead, when the deceased would wander the land to possess earthly souls. To keep these spirits at bay, the Celts dressed up as ghouls and monsters and put out all lights in their homes. With that, they ventured out as mischievous and wayward undoers willfully wantoning peace and property. The Celtic priests or Druids also built bonfires on this day and offered sacrifices. The idea behind all these was, of course, to scare away the spirits of the dead and avoid being “possessed” ! Now if you're brainy enough, it won't be hard for you to guess that the modern tradition of wearing costumes on Halloween traces back to this ancient Celtic practice !
The sinister attitudes of the Celts on Samhain toned down over the ages to give way to the less menacing attributes of today’s Halloween. The playfulness and fun side of Halloween was first brought to America by the Irish immigrants around 1840. Like for instance, the popular tradition of trick-or-treating on Halloween came from the Irish. This had been 'gifted' to the United States by the Irish immigrants who fled their country during the potato famine. The Irish celebration of Halloween or the Hallow E'en (evening of the Hallow), as it's called in Ireland, means All Hallows Eve, or the night before the 'All Hallows'. All Hallows Day is on November 1, and is also known as All Saint’s Day (a day to honor all the Catholic saints). ‘Hallow’ is an Old English word, meaning ‘saint’. November 2 is the All Soul’s Day—a day which honors all Christians who no longer live and were not saints. And the period of October 31 to November 2 is known as the Hallow Tide. Now, on All Hallows Eve or Halloween, the Irish beggars went asking for food or money from the rich. If refused, they were threatened to be destroyed by the evil spirits. And, of course, nobody wants to take a chance on Halloween. So soul-cakes or currant buns and candy bags chockablock with goodies were kept ready for the Halloween Day.
Sean Carter writes on holidays, events and celebrations around the world. He also writes on family, relationships, womens issues birthdays, inspiration, religion, love and friendship. He is a writer with special interest in ecard industry. He writes for 123greetings.com
Subscribe to:
Posts (Atom)