Are you in need of a few simple kids craft, consider wood projects. Simple kids crafts come in a variety of patterns, including paper crafting projects, mache, scrapbooking and beading, wood projects are not typically the first to come to mind. Don't worry, there are a number of easy and safe wood crafting projects that are great for children, and do not require any fancy or dangerous tools.
Simple Kids Crafts Build Confidence
There is no doubt that crafting is very popular and an excellent activity for children. It's fun and entertaining to work with your hands, and it helps the children express their creativity. Motor skills, and hand eye coordination are improved and a child develops a dexterity and connection with the project that is a wonder to behold. Creating unique pieces of art gives the children a sense of accomplishment and pride, and seeing the satisfied smiles on their face is a reward in itself.
Wood Craft Projects Are Easy
There are quite a few interesting and easy wood crafting projects that are appropriate for kids. For many reason, woodworking projects have been closed in schools, and unfortunately this has closed access for kids to what can be a very rewarding and creative activity. Unlike some other craft creations, a woodworking project will stand the test of time, and each completed project is a completed memory that they will be able to take with them for years to come.
The Key To Children's Wood Projects
But children of a young age shouldn't work with dangerous saws, nails and other woodworking tools you say? That is entirely true, and I don't recommend anyone strapping an adult tool belt on their 5 year olds waist! The answer to this woodworking dilemma is the dowel system. There are countless woodworking projects that are pre-formed, requiring no cutting or sanding. One need simply buy the woodworking set and connect the pieces of the project.
A common woodworking project is to create a key holder. This can be done, simply, safely and is also very functional. Your child can be involved in creating something that is not only gazed upon, but contributes to the families activities day in and day out. Depending on your child's age, you can get fancy by staining or painting the completed project.
Simple Projects for Older Kids
For older children interested in working with wood, you can resort to classic wood projects such as mailbox making or tree houses. These projects might require a little more supervision but the results can be very rewarding.
Whatever simple kids crafts you choose, remember that you are not just killing time, but creating quality memories of time spent together. Wood working, scrapbooking, beading, whatever the case may be, you will remember these moments with your loved ones for years to come.
Feel the satisfaction of working with your hands and creating beautiful simple craft projects.
Check out the definitive location for craft ideas, bead supplies, scrapbooking materials and more... check out the hundreds of quality craft kits and get started creating today!

Showing posts with label Kid's Crafts. Show all posts
Showing posts with label Kid's Crafts. Show all posts
Sunday, January 03, 2010
Friday, July 31, 2009
Candy crafts -- a sweet way to keep kids occupied
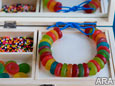
(ARA) - School’s out, the neighborhood pool is open and you are responsible for keeping the family active and engaged this summer. Whether you are taking a beach vacation or spending a day around the house, you can easily fill the time by planning several simple, budget-friendly, do-it-yourself activities. Ideal for indoor or outdoor time, these activities go a long way in creating personal summer memories without doing a number on your budget.
Theme day
The cost to take the family to a baseball game, amusement park or museum adds up quickly. This summer, think thrifty and save on the admission fees by organizing a craft day around the theme of your favorite family outing (think aquarium, ballpark and carnival). For example, bringing the enjoyment of America’s favorite pastime to your living room or backyard is easy when you buy several plain cotton baseball caps, tube socks (they only cost a dollar or two each) and T-shirt paint. Use the materials to let your kids personalize baseball apparel and then suit-up, grab some peanuts and gather the group to play catch in the backyard, for an impromptu tournament on your favorite gaming system or to catch a double-header on the tube. It’s a ballpark outing for a fraction of the cost.
Have your candy and craft with it too
Most families make weekly (if not more frequent) trips to the grocery store, so turn your next routine trip into the beginning of a new project by strolling down the candy aisle. “The grocer’s candy aisle has a collection of candy in virtually every color and shape, which means endless crafting possibilities,” explains candy expert Beth Kimmerle. “Candy is tasty and fun for kids of all ages, and is an affordable tool for crafting.”
Start by making candy jewelry. It is a perfect activity for your princess, but also trendy for your prince given the popularity of sports necklaces and bracelets for boys and girls. Gather an assortment of brightly colored Life Savers Gummies, tie a knot in a piece of ribbon to keep your candy from slipping, and thread your “jewels” onto the necklace. Once you have a full string, adjust the candy so there are equal amounts of ribbon on each side. Tie knots on each end to finish and voila, you’ve got the trendiest kid on the block. While you are lending a hand, don’t forget that gummy candy is a yummy treat while crafting. Who knew jewelry could be so inexpensive and tasty?
Treasure your trash
Next time you start to throw away packaging, leftover candy or craft items, stop and envision these items as your next treasure and creatively think of ways to reuse them. Re-using the items helps you to be less wasteful, while also saving you money and giving you “gems” to finish your crafts with a unique touch.
If your kids love trucks, drum-up some fun on a weekend and help them create something fabulous on four wheels from common items found around the house. Try the following simple exercise and in no time you’ll be watching your kids proudly race their handmade creations across the kitchen floor or back porch.
To make a truck you will need:
Egg carton
Berry basket
Craft paint and paintbrush
Scissors or craft knife
Twine
Glue
Cardboard
Colored paper
Gum foil
4 Hubba Bubba Sour Gummi Tape packages
5 Hubba Bubba Glop packages
2 Life Savers candies
4 Altoids mints
Instructions :
Note: Cutting with sharp implements should only be done by adults.
Using an Exacto blade or sharp scissors, cut a 3-inch by 2-inch front window area from the berry box. Paint the egg carton orange to use as a truck body and paint the berry box white to use as a truck cab. While those parts are drying, paint your four empty Hubba Bubba Sour Gummi Tape packages black for truck wheels.
Cut a 6-inch by 4-inch piece of cardboard and glue the same size piece of orange craft paper to the top. Next, to make the truck’s load, stack the six empty Hubba Bubba Glop packages and glue them onto the orange board. Tie twine around the board as straps, tightly securing twine at the bottom of the board. Now, glue the finished load onto the back of the egg box.
Glue Life Savers candies for lights below the front window area of the white-painted berry box and glue the finished cab to the front of the egg box. When the wheels are dry, glue 2-inch silver circles with smaller red 1/8-inch foil circles on top of the painted Hubba Bubba Sour Gummi Tape packages and glue Altoids in the middle to finish the wheels.
Finally, glue the wheels evenly to the bottom of the egg carton truck. Let them dry completely and then go have fun.
Courtesy of ARAcontent
Monday, December 29, 2008
Printable Crafts - Creative Arts and Crafts to Do at Home
Printable crafts are a great idea for a rainy day at home with the kids. Let's face it though, you don't have to be a kid to enjoy doing crafts. The list of possible crafts is endless. Below there are a few favorites that you might be interested in.
Origami is a traditional Japanese form of art, a technique of folding paper into different shapes or ornaments representing forms such as those of flowers or animals. The online printable will have an image with lines of where the item should be folded. There are printables available online for all different skill levels. Most offer simple directions.
A mobile is a hanging sculpture created from ornaments, string and sticks. Mobiles can be made of many things. Printables will often be ornamental shapes or pictures. The printable crafts available online will sometimes require you to add your own string or sticks.
Paper Dolls are paper representations of characters or humans. These dolls are usually cut out and put in a stand. The printables for paper dolls work better if printed on a heavy paper or card stock. The paper dolls usually will include changes of clothes or accessories to make play time more imaginative and exciting.
Coloring Pages are available in abundance. These pages can be fun but can also be educational. There are many pages that are "workbook" pages that will require a child to complete a lesson or skill. Some coloring pages are offered as complete coloring books. This option is great for keeping children busy during long car trips. Themed and level appropriate activity books are also available. These usually include coloring, reading, math, science and some kind of social studies skills.
All crafts come in a variety of seasonal choices like pumpkins, christmas ornaments and turkeys. Some crafts are colored some require coloring. Other crafts may require additional supplies such as glue, string and scissors. If your child is in love with a particular character that they have seen on television or in books. These character sites often offer crafts specifically themed to that television show or character. This offers an additional bonus of saving money by not having to purchase the "specialty" craft and coloring books from the store.
When searching the internet for printable crafts, be sure to use only reputable sites. You should not allow your children to search for the crafts by themselves because there are many sites that offer adult themed crafts that are not for children's eyes. There are sites that are specifically geared toward printables for teachers. These sites offer a great selection and can usually be trusted.
There are many other printable crafts available on the internet. When searching the internet, phrase your search query to include specific theme key words. There are many that will suit your particular situation.
Wendy Pan is an accomplished niche website developer and author.
To learn more about printable crafts, please visit Fun Arts and Crafts Ideas for current articles and discussions.
Article Source: http://EzineArticles.com/?expert=Wendy_Pan
http://EzineArticles.com/?Printable-Crafts---Creative-Arts-and-Crafts-to-Do-at-Home&id=1633410
Aluminum Can Crafts - Interesting Craft Ideas
Kids love crafts, and aluminum cans are a perfect craft base because they are in abundance. The aluminum makes them sturdy and sometimes waterproof (depending on what is put over them).
Free Aluminum Can Crafts - Ghostie
For this project you will need to gather an aluminum pop can, clear acrylic spray, white and black paint, fishing line, paint brush, masking tape and scissors. Before you begin, remove the tab from the top of the can. The can will need to be crushed in a certain way, so it might be a good idea to have some extra cans around in case the originals don't get crushed the way you'd like them to. For the silhouette of the ghostie, crush the top part of the can in one direction, opposite the bottom portion. If sharp edges remain, these should be smoothed over with masking tape. Depending on the type of paint you're using and the colors in the crushed can, it may take several coats to cover the can so it appears simply white.
The black paint is now used to create the mouth and eyes. The opening of the can, where the tab was pulled, should be used as the mouth, and eyes can be hand painted above that opening. Wiggle eyes can be used, but it's best to glue these on once the whole project has been sealed. Allow the paint to dry, and then use one more dot of white inside the black eyes. You can then create a 3-d effect with the eyes to allow the white dots to dry then add two more black dots. This makes it look like an pupil and gives it a little more interesting detail. Seal the ghost with acrylic spray using as many coats as you wish. Attach the fishing line to the back of the ghostie then hang it from a window or doorway!
Free Aluminum Can Crafts - Christmas Tree
You'll need 27 emptied and rinsed aluminum cans, Christmas tree lights (one or two strands), spray paint, a hot glue gun, a foam core board or piece of plywood, and duct tape. Arrange the cans by creating a trunk of three cans in two rows, glued together with hot glue. On top of this, six cans are glued together and lay on top of the "trunk." On top of the six row (or first layer), create a five can "branch," then four, then so on, until you have one on the top, so it resembles a Christmas tree. Spray paint the tree whatever color you'd like, secure the lights with duct tape, pushing the lights between the cans. Glue your tree on to the piece of plywood if it is to be hung outside, or use the foam core for indoor use. Try using stickers as ornaments, and even a tree topper!
Free Aluminum Can Crafts - Cow
Items for this project include white, black and pink paint, white felt, wiggly eyes, an aluminum can (crushed) and acrylic spray paint. Crush the can so the head of the cow (top of the can) is crushed above the bottom portion. If there are jagged edges in the tab (which needs to be pulled out), soften with masking tape. Paint completely with white paint, allow to dry. Pain black cow spots on the can (they resemble clouds), and a pink nose on the tab portion of the can. Attach white (or black) felt triangles to the back of the cow's head. Seal with acrylic spray and when this process is complete, glue on wiggly eyes. Instant cow! Following these simple directions and with minor adjustments, you can make an entire barnyard!
Wendy Pan is an accomplished niche website developer and author.
To learn more about free aluminum can crafts, please visit Free Crafts Center for current articles and discussions.
Article Source: http://EzineArticles.com/?expert=Wendy_Pan
http://EzineArticles.com/?Aluminum-Can-Crafts---Interesting-Craft-Ideas&id=1584040
Friday, December 05, 2008
Dyeing Pasta for Craft Projects
Kids love to play with pasta! Who knew something so simple and inexpensive could be so interesting to young children.
Dried pasta comes in a variety of sizes and shapes. If you don't already have some in your kitchen cupboard, you can find a variety of different pastas to choose from in the bulk section of your grocery store. Let your child go with you to pick it out.
Pasta can be used for a variety of craft projects, and it is very easy to dye. It takes only a few minutes to dye the pasta, and a couple of hours for it to dry.
To dye the pasta all you need is:
- Pasta in different shapes and sizes
- Food coloring
- Rubbing alcohol
- Several small bowls
Pour approximately 1/2 cup rubbing alcohol into each bowl. Add 10 or so drops of food coloring into each bowl, one bowl for each color. Drop the pasta into the bowl and stir gently with a spoon for a few seconds.
Remove the pasta from the bowl and allow to dry for several hours on a paper plate. The colors will brighten as the pasta dries.
Your kids will enjoy playing with their colorful pasta. They can use it to create macaroni necklaces or they can glue pieces of pasta onto a sheet of paper for a creative work of art.
Children as young as two years old will enjoy counting and sorting the pasta into different piles. Have them separate the pasta by color or shape. They will have fun moving the pieces of pasta from bowl to bowl.
Rachel Paxton is a freelance writer and mom of four. For scrapbooking, card making, gift-giving ideas, and more family memory-making activities, visit http://www.crafty-moms.com. This page printed from: http://www.crafty-moms.com/kids_crafts/dyeing-pasta.shtml
Monday, November 26, 2007
Kids Christmas Crafts - Wrapping It Up
Christmas is just around the corner and time to think of gifts for family and friends. I've always found that making gifts is so much more satisfying and enjoyable than spending lots of money so why not encourage the kids to make their own gifts? The making of kids Christmas crafts means them using their imagination and having fun, something that most kids enjoy.
There's no need to stop at making the gift -- why not make the wrapping paper too? Here you will find a few ideas on wrapping those special gifts.
Bubble Wrap Paper:
You will need bubble wrap packaging, butcher paper, tape, thick paintbrush, paint with a few drops of liquid dish wash.
Tape the bubble wrap on a flat surface. Paint the wrap in various colors. While still wet lay the butcher wrap over the bubble wrap to transfer the colors. Lift carefully and allow it to dry.
Salty Wrap:
For this you will need butcher paper, cookie cutters in Christmas shapes, glue (in a saucer or plate) and salt.
Spread the butcher paper out flat. Dip the cookie cutter into the glue and place on the paper to create a glue print. Using a spoon sprinkle the salt on the glue areas, gently move the paper to scatter the salt. Allow to dry and pour off excess salt. You can also pretty up a plain roll of foil paper this way.
Print Wrap:
Materials required: butcher paper, Christmas print stamps, cookie cutters and paint.
Stamp the paper with Christmas theme stamps and use the cookie cutters dipped in paint to make other designs.
Hand crafted gifts made with someone special in mind are always precious. What better way to display the kids Christmas crafts than wrapping them up in hand designed paper.
Lyn Bell has been in the finance industry for more than 30 years and is a Certified Financial Planner. Arts and crafts is one of her hobbies which she enjoys sharing with others. Kids Christmas craft ideas to fill the wrapping can be found at http://hubpages.com/hub/KidsChristmasCrafts . For more craft ideas for kids visit http://craftideasforkids.weebly.com/ and http://artsandcraftsforkids.weebly.com/
Saturday, December 09, 2006
Crafts – a great way to bond with your kids
101 Easy Crafts Projects
Crafting has long been a great way to bond with kids. These days kids are so consumed with technology that they often don’t even know what making crafts means.
Make a connection – If you are having trouble connecting with your child, try crafting with her. Find a fun craft that you know she will enjoy and block out some special time with her. Crafting together is an easy way to get one-on-one time with your kids and find out what’s going on in their minds.
Give emotional support – As you craft together, your child will probably be more willing to open up and talk to you about things that are on his mind. If there is something bothering your child and he opens up and shares his problem with you during your craft time, give him emotional support. Offer your advice and let him know that you are there for him, unconditionally.
Keep it light and fun – If you craft with your child specifically for the purpose of bonding with her, keep your craft time fun. Try not to obsess about how perfect she’s painting or getting the bead glued on just right. Keep your craft time relaxed.
Encourage and stay interested – Many adults suffer from low self-esteem as a direct result of their parents’ negative attitude towards them during childhood. As you craft with your kids, be interested in what they’re doing. Kids love to share their artwork. Be encouraging and pay positive comments to your kid about their craft. Show them that you are interested in them.
Sherry Frewerd publishes 'Grandma Rosie's House'...Stop By and Visit Today!
Subscribe to:
Posts (Atom)